I had been wanting to make myself a hollowing support system for quite a
while but was unhappy with the available options. The popular 'captured D' rig
is way too bulky for me, blocks access for the tailstock for
drilling and blocks the view along the bed into the form. The Vicmarc
support system has the same setbacks without the bulk and is most suited
to a longer bed lathe due to the 'post' mounting on the lathe bed. A
clever bloke from down Canberra way (onya' Fredo) came up with a design
which overcame some of the problems with the Vicmarc unit but
unfortunately still didn't meet my needs (fussy bugger at the best of
times!). I also wanted to come up with a design that the average woodie
could make without the need for a full-blown machine shop.
And so, after many months of pondering and procrastinating, 'Robbo'
was born unto my shed! Using the back-end of the double-ended Stubby
banjo and arranging the 'arms' so they could swing over the top of the
post was the trick in getting the pivot out of the 'line of fire'. All
the components except the bearings are easily scrounged and the 6 thrust
bearings cost a total of $27. The only power tool you'll need is a
bench-drill and maybe a grinder which most woodies have anyway. At worst
you might have to buy a tap and die to cut some threads but it still
makes for a very cheap system. Now before you go running off at the mouth
about most lathes not having double-ended banjos, check out the easily
made alternative at the bottom of this page.
Once I had the prototype (pictured below) up and running I realized it was
like having someone else look after the 'lift' and 'roll' you encounter
when hollowing so you can concentrate on where you're going. This
reminded me of an image etched in my mind of Robbo, a pro-turner and
half-decent bloke from Tooradin, teaching Helmut, a newbie from
Melbourne, how to rough down a blank. While Helmut assumed the normal
stance and grip with a huge roughing gouge, Robbo was off to his side
with one hand holding the middle of the gouge, guiding Helmut safely into
his daunting 'first cut' - hence the name for the support.
|

 First cuts - started out with an upright handle but it didn't feel right. Also
tried a couple of my tool-holder shafts to see how they would go. All
seem OK with just the 2 grubscrews holding them in place.
|
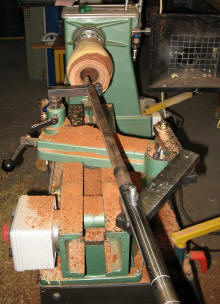 As seen from the end of the lathe, using the support feels quite
natural with out all the guff of the other support systems in the way -
just like free-hand hollowing without the shoulder wrenching, gut
busting and undie changes.
|
 You get a good, clear view into your form at all times...
|
 .......and just slide the banjo forward to bring up the tailstock to drill the
next stage.
|
 Exploded views after stopping to 'pretty' it up a bit. The 'handle' is a
fork leg from a very old Honda CB100 - 27mm OD, 18mm ID - hefty and
strong but machineable.
The arms are 20x40mm offcuts from plate steel. You could use say 25mm
square or thereabouts but just make sure the overall height will fit
between centre height and the banjo you use.
I had some 12mm shaft from an old printer that I threaded to use for
studs but using 12mm threaded rod offcuts from any building site would
work just as well.
Use Nyloc nuts in the final assembly to get just the right pressure on
your thrust bearings. |
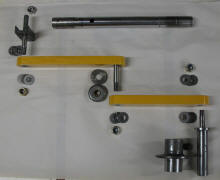 The
joining stud that is fixed into the top arm could just as easily be
welded or riveted in place. The
joining stud that is fixed into the top arm could just as easily be
welded or riveted in place.
I used round stock for the main pivot but you could just as easily use
the same square stock as your arms if you use the alternative banjo at
the bottom of this page. This part does not have to rotate but is simply
your height adjustment. To fit the stud, I held the 1" stock in my
extended jaws and drilled it out on the Stubby then cut a 12mm thread in
it but you could do the same in a drill press as long as you set it up
squarely.
The 'odd' thrust bearing is just a heavier duty one I had laying around
that helped with spacing the 2 arms. |
 Nice and compact when not in use so it's easy to store. I've since
slipped a foam rubber grip over the handle so it looks more
professional.
 |
 In use, I realized the handle clamp is really unnecessary as the
hollowing action is trying to lift and rotate the handle. A simple
disc/block fixed to the stud would serve just as well.
 |
 I made the banjo adaptor flange from a hollow bar offcut and a rusty old
machine washer welded together. Reamed the hollow bar out on the Stubby
with a 1" drill bit I scrounged - not perfect but it does the trick.
 |
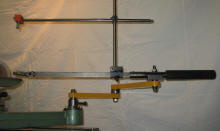 Next came the obligatory laser guide. Not essential and I didn't know if
it was going to be worth the trouble but you've got to give these thing a go. Ends
up worth it's weight in gold!
 |
 Had to come up with a clamp that would work on both the square and round
tool holders - this did it nicely. 20mm square bar drilled and slotted
to suit some old 1/2" shaft from a digital scanner. Welded the bar
to a piece of 25mm RHS with a screw angled in to clamp it in place. (No
comments on the weld quality please!)
 |
 Same square bar drilled and slotted at 90 degrees.
 |
 Used a chunk of some sort of synthetic to mount the little laser pointer
so as not to damage it - simply drilled and slotted like the previous
clamp. I was pleasantly surprised that the laser wasn't affected much by
vibration so the point of light was still useful.
 |
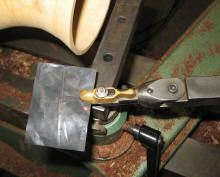 Using a piece of plastic to position the laser for the Proforme cutter
head (my preferred hollower).
 |
 In use, the laser made it very easy to get a uniform wall thickness. You
can see the beam just about to pass the outside edge here.
 |
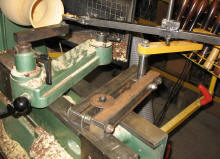 As an alternative to double-ended or second banjo, you can make
something like this quickly and easily with just a drill press, a
hacksaw and a file or two.
I only made this out of very lightweight scrap to demonstrate the
design. If you were going to make one for use, I would suggest RHS at
least 2.5mm thick and about 50mm square. Even as light as this one is, I
gave it a try and it worked just fine - might even be a keeper. |
 Remember that all the banjo is holding is the lift and roll that you
would manage yourself while hollowing free-hand so it doesn't have to be
built like a tank.
|
Back to Top
|
Back to Gadgets
|