|
|
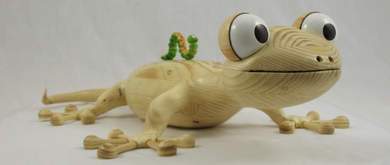
Box-bellied Gecko
| |
Our local woodworkers group challenge for this year was to make anything at all from a pine pallet. There wasn't much left worth using by the time I got the damn thing apart so I dressed what was there and cut out the knots to have my first shot at carving something - with a little bit of turning along the way. Thought I'd go for the 'cute' factor to get a look-in on the People's Choice award. |
|
|
|
|

The victim. |
The blanks for the body, legs and eyes glued together. The toes were turned from strips cut from the waste. |

The body outline was cut out on the bandsaw and the waste was re-attached with hot-melt glue. |

The side elevation was cut on the bandsaw next. |

Oops! - used too much hot-melt glue! The remaining waste was removed by heating the whole thing in the oven to soften the glue. |

I used a 4" carbide disc on an angle-grinder to rough the shape down except the end of the tail which I wasn't game to weaken that soon. |

I then drilled stepped mortices in the body to accept the leg tenons which were turned on the lathe. |

Before gluing the legs in, I marked a rough groundline on them by hanging each leg over the edge of the bench while the belly was flat on it, then cut them off on the bandsaw. |

Once glued in place, the outline of the legs and feet were then cut out on the bandsaw. |

I rigged a platform up beside the belt sander so that the Gecko's belly would sit just a couple of millimetres above the deck, then just rotated him into the sander to level the feet - worked a treat! |

Next I pinned him to a large faceplate with the tailstock while I fixed him to the plate with screws into his legs. |

Hollowing out the box was easy enough - getting a decent finish on the inside of the box wasn't so easy though - rubbish bloody timber!!! Next I turned a lid to fit and wedged it in place with tissue paper so it could be shaped with the body. |

I started refining the shape with small drum sanders in the Dremel but found they dug into the soft sections too much and ended up doing most of the shaping with sandpaper on various shaped blocks. A couple of flat recesses to seat the eyes on on the head were produced by a Forstner bit. |

Turning the toes was an easy, one-tool, non-stop job, getting 3 toes from each blank followed by flattening of one side with the belt sander. Attaching them was not so easy! The drill wandered anywhere it pleased in the soft sections, completely splitting one foot in two - blessed be the CA makers!!! Epoxy glue to hold the toes in helped fill some of the voids and bind the whole foot together for a bit of strength. |

Turned some small beads to create the grub for a handle for the lid. Each bead was drilled through before being parted off. |

Each end of the beads was angled on a faceplate sander then slipped over a wire and glued in the manner of a rubbed joint. |

Ready for colouring and pinning to the lid with tiny dowels. |

All the shaping and sanding done. My original plans to texture and air-brush him were foiled by the deadline for entry into the competition so I just painted the eyes and coated him with wipe-on poly. |
|
|
|


|
|
I gratefully managed to score 1st prize again this year in the competition but still missed that elusive People's Choice award by 5 votes to a toy cattle truck - hmmm! - might have to go for the rural theme next year! |
|


|
|
Back to Top |
|