There is probably a hundred different ways to turn an egg and even my own methods change according to the timber I'm using and the required quality of the result. What follows is my preferred method - not necessarily the best or quickest method - just the way I do it to make eggs for my timber collection. | |
| |
| |

I usually turn a spigot on one end ...... | |
| |
| |
| |
| |
| |

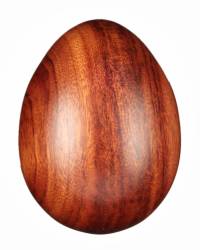
Now is the time to fill cracks or voids if there are any, then sand the egg to remove all tool marks. Experience will tell you what grit to start with but if you're careful with the chisel, you should be able to start at about 240 grit and work your way up. My 'collection' eggs all get the same treatment, regardless of wood type - sanded through the grades to 1000 grit, a rub at speed with Ubeaut EEE polish followed by 2 coats of Ubeaut Shellawax burnished in at high speed. | |
| |
| |
| |
| |
| Back to Top | |


Making an Egg-chuck... |
|
To finish the parted end of the first couple of eggs I made, I just sanded and hand finished to remove the stub but I decided this wasn't good enough as I wanted fully polished eggs with no sign of how they were produced. A few simple modifications to a PVC pipe fitting produced a simple chuck to hold the eggs which are loosely sized on a standard XL chooks egg.A friend asked me to make them a chuck so here is the step-by-step .... | |
|
Use a parting tool to separate the tube past the end of the thread by 15 or 20mm. | |
|
Use a skew chisel to cut a notch to suit the dovetails of your chucks jaws. | |
|
| |
|
Screw the outer ring on and true up the inner diameters with some form of scraper - I use a Sorby hollower for this type of cut. | |
|
Cut 2 disks of scrap timber just bigger than the largest inner diameter of the PVC fittings. I use ply for strength in all directions but any scrap will do. Drill the centre of the disk and mount it on a screw-chuck with a scrap timber spacer behind it to keep your tools away from the chuck. | |
|
Shape the disk to fit snugly inside the base of your egg-chuck. If you take too much off, a layer of masking tape will take up the slack - it's not that crucial but you do want it tight enough to stay in place while the seat for the egg is cut. | |

Mount the egg-chuck base on the jaws and fit the disk in place. Turn a bowl shaped recess into it to suit the shape of the big end of the eggs you create. | |
|
Mount the 2nd disk on the screw chuck the same way and shape it to fit snugly...... | |
|
.... inside the outer ring. | |
|
Remove the disk from the screw chuck and grip it in your standard jaws but do not tighten it too much as you will be left with a fairly thin ring which will crush easily. Turn away enough material working from the centre outwards to allow the small end of an egg to protrude far enough to work on finishing it. Be careful doing this as you are working very close to the steel jaws. | |
|
You may need to 'tune' the seats in the disks to get the 2 disks close enough to each other to allow the outer ring to screw on to the base sufficiently. (I would want at least 2 full turns connected) | |
|
There ya go Toni! | |
| Back to Top | |
The Eggsactly gauge... |
|
After turning about 30 or 40 eggs with no end in sight to the types of timber available, I thought it might be a good idea to have a gauge to help make sure the eggs would fit in the egg-chuck OK.
| |
| Back to Top | |
Photographing the eggs... |
|
This is not so much a "How to" as it is a "How do I" photograph the eggs as I'm still not 100% happy with the results I'm getting with my current setup but I don't know what else I can do to improve them any further. If you have any tips or ideas, please leave me a note using the 'Feedback' page. The photos from egg #462 onwards are about as good as I can get them - except the reflection from the 2 halogen lamps - if I could get rid of that I'd be a very happy camper! | |
| |
The background is black velvet and black cardboard was used to make the 'ring' - all this was to avoid the white reflections or 'flare' on the margins of the egg that have plagued me for so long. With the black background I could finally get a crisp edge on the egg but needed a narrow white border to make later editing possible, hence the white egg shaped disk behind the egg, close enough that it does not reflect off the egg. | |
| |
The colour reproduction from my new camera is spot-on so once the shots are taken, all I have to do these days is remove the background, crop and resize. | |
| |
|
| |
| Back to Top | |
Collectors/Display Cabinet... |
|
A pile of egg-cartons stretched across the couch in the living room is not the most attractive way to show off a collection of anything so I designed and built this cabinet to suit my needs.
| |
|
| |
| Back to Top | |
Gallery Egg display boards... |
|
| |
| |
| |
| |
| |
| Back to Top | |