|
Components of the Table-mobilizer... |
 Apart from the castors and a few bolts, what you see here is all there is to it!
The fixed frame is just 4 pieces of 25x2mmRHS with 8 strips of 12x5mm flat
welded to it to form the four slots. There a four 8mm holes for the fixed
pivots, two 12mm holes for the threaded rod to rotate in and four 7mm
mounting holes - that's it!
 The castor frame could just be a simple rectangle of 25x2mmRHS with four 8mm holes for the
lifting arms to attach to but I chose to add the pieces of 75x105mm angle to
mount the castors on which allows them to be stowed right up out of harms
way. The castor frame could just be a simple rectangle of 25x2mmRHS with four 8mm holes for the
lifting arms to attach to but I chose to add the pieces of 75x105mm angle to
mount the castors on which allows them to be stowed right up out of harms
way.
|

The pivoting arms are made from 25x8mm steel but I could have got away with 6mm
thick. The fixed-arm is offset by 25mm to allow the whole thing to compact
down and the stud to attach the sliding arm to is an 8mm bolt welded flush
on the back for clearance.
Note: I have never claimed to be a quality arc-welder - I get by! . . .
. . . . barely!!!
|

The sliding-arm has a 12mm hole one end to slip over the cross-slide and an
8mm hole the other end to attach to the fixed-arm.
|
|
 The cross slides are 25x2mmRHS with 12mm flanged nuts (shed nuts) welded into
each end. 12mm bolts with a bit of straight shank are then screwed in
tightly, the heads cut off, and a flat filed onto the top and bottom faces
where they fit into the 10mm wide slots on the fixed frame. The drive-nuts
are 12mm flanged nuts welded on to the middle of each slide.
|
|
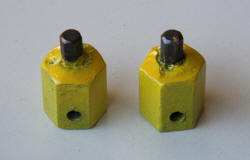
 The drive adaptors were a bit tricky without any brazing gear. A tie-rod (12mm
threaded rod that builders use) joining nut was cut in half and a 5mm hole
drilled and tapped in the side of each half to take grub-screws. Then I
drilled a 6mm hole down the centre of a short piece of tie-rod and hammered
the piece of hex-drive key into the hole and tacked it on the back with a
zap from the arc-welder. This assembly was then screwed into the tie-nut and
tacked in place without touching the hex-drive with the arc - ugly but it
works!
|

The slots for the slides are formed by welding on strips of 12x5mm flat-bar
with a 10mm gap between them.
|

The castor mounts are 80mm lengths of 75x105x5mm angle iron. The castors
could just as easily be screwed directly on to the face of the frame if you
weren't worried about having the extra clearance under the table. |

This is the basic assembly - nothing much to explain really - wind a length
of tie-rod through, add a few 8mm bolts with Nyloc nuts so they don't bind
or come undone, give all the joints a wipe with a dri-lube stick and Bob's
your uncle!!! The only modification to the length of tie-rod was to file a
flat on each end for the grub-screws to bite into.
|
|

Fully assembled with el-cheapo castors I had on hand. These castors are such
rubbish that they actually let the whole thing down and I intend to replace
them as soon as I find some decent quality units.
|
|

The finished unit in the collapsed position - only 105mm to the top of the
castor mounts.
|
|

The completed lifter is simply attached to the table with four wood screws into
the rails.
|
|
| Back to Top |
 |