Dunny-roll cabinet


            in Northern Silky Oak


This project was on the drawing board for a very long time - over ten years in fact! I promised to make it for some very good friends in Far North Queensland and it just took me a while to get motivated. I wanted it to blend in with the rest of their toilet which is all polished timber, including the door which came from an old building in the region and was made of solid Silky Oak - the good stuff too - cardwellia sublimus - not that grevillea rubbish! I rescued the timber for the pillar for this piece from my friends rubbish (possibly came from the same place as the door), which makes it kind of special, and the rest of the timber I found by accident in my stash.
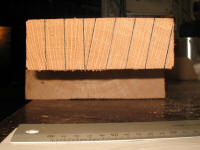
First step was the cylinder for the cabinet which was the tricky bit and everything else would be turned to fit. I wanted to really show off the medulary fleck so I cut the staves on the quarter as shown.
The 10 staves, 240mm long x 50mm wide, were thicknessed to about 12mm and then the edges trimmed at an angle of 18° on the tablesaw. My saw is a bit rough so I refined the sides on the jointer after sawing them.
I layed the staves out for each half on strips of masking tape to make assembly easier. I then glued the edges and rolled them up with tape across the open end to hold each half together while I got a rope clamp around both halves.
A loop of cord with a stick through it to tighten it applied enough pressure to close all the joins sufficiently.
To my surprise, the two halves mated well enough that they didn't need trimming....
... so I glued them together and clamped them with rope and sticks as before.
Once the glue on the cylinder was thoroughly dry, I turned 2 pieces of waste into disks that would fit in the ends and centre the cylinder.
With just enough pressure applied to hold the cylinder without splitting it, I trued and sanded the outside. I also trued the ends with a parting tool as far as I was game (left just enough to keep things centred on the waste-chuck.
I then turned another piece of waste to accept one end of the cylinder and glued it in place.
Using the tailstock and one of the disks to keep the cylinder aligned while the glue dried.
Proceeded to true the inside of the cylinder with my articulated rig which was way too easy...
... followed by a shear-scrape to clean up the ridges...
... and sanded the inside with paper wrapped around a cylinder of waste-wood.
Once the cylinder was parted off to final length (230mm), I could confidently cut the disks for the top, bottom and base of the cabinet.
First step on each disk was to use a Forstner bit to drill a hole about 12mm deep in each one that would initially be used as a recess to mount it on the chuck, but would later become the mortice for each end of the pillar.
Started with the top of the cabinet, turning a recess to reverse it on the chuck later and a step for the cylinder to attach to.
Once reversed on the chuck, the top was shaped and sanded and an 8mm was hole drilled for the knob to be glued into.
The bottom of the cabinet was shaped and sanded along the same lines as the top, with a step to attach the cylinder to...
...but this time the hole is for the tenon that will be turned on the ends of the pillar.
The base is pretty straightforward - shaped along the lines of the cabinet (a flat bounded by beads) for maximum weight to aid stability...
... and the forstner hole becomes the mortice for the pillar.
Any design at all will work for the pillar - I wanted it very thin towards the top to 'isolate' the cabinet.
A tenon is turned at the top to suit the Forstner bit used earlier...
and the same treatment for the bottom end.
While the pillar could happily be glued in to the base and cabinet, I needed to 'flat-pack' mine to ship it to my friends so I glued a 1/4" threaded rod in the top and bottom of the pillar and screwed threaded inserts into the base and cabinet to suit. The threaded rod also helped strengthen the thinnest part of the pillar.
I used a Japanese pull-saw to cut the door from the cylinder (4 staves wide) and sanded the edges to clean them up.
This is where the fun began! I'm not much chop at aligning these hinges and had a hell of a time getting the door to sit just right - filled and redrilled many holes before I was happy with it. Note the CA in the screw holes to strengthen them against the tiny screws stripping the holes out .
Found the easiest way to shorten the door by 2mm or so for clearance was to use the face-plate sander.
Some decorative holes in the door let you see if the cabinet is stocked up.
 
Not wanting anything protruding from the cabinet, I decided on this slit arrangement for opening the door - just poke a finger in and turn or twist to break the grip of the 5mm magnet glued into the cabinet wall.
Not wanting anything too synthetic, I went with a Danish oil finish - many, many coats to get the build and sheen I was after. All topped off with a coat of traditional wax and a buffing.


Back to Top